From inside (document excerpt):
Operator’s Manual ® Grass Bag Kit for the 33-inch Wide Cut Mower Model No. 33731 CAUTION: Before using this product, read this manual and follow all safety rules and operating instructions. Sears, Roebuck and Co., Hoffman Estates, IL 60179, U.S.A. Visit our web site: www.craftsman.com FORM NO. 769-03115 3/26/2007 TABLE OF CONTENTS Warranty Statement 2 Assembly and Operation 3 Español .7 Service Numbers . Back Cover WARRANTY STATEMENT Repair Protection Agreements Congratulations on making a smart purchase.
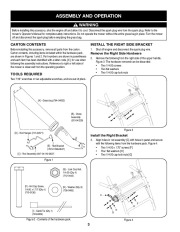
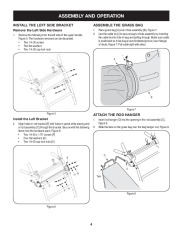
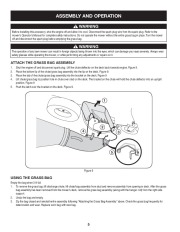
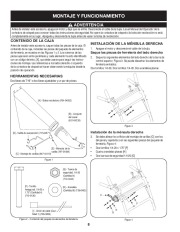
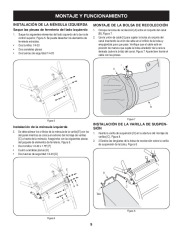
Your new Craftsman® product is designed and manufactured for years of dependable operation. But like all products, it may require repair from time to time. That’s when having a Repair Protection Agreement can save you money and aggravation. Here’s what’s included in the Agreement: · Expert service by our 12,000 professional repair specialists · Unlimited service and no charge for parts and labor on all covered repairs · Product replacement if your covered product can’t be fixed Discount of 10% from regular price of service and service-related · parts not covered by the agreement; also, 10% off regular price of preventive maintenance check · Fast help by phone phone support from a Sears technician on products requiring in-home repair, plus convenient repair scheduling Purchase a Repair Protection Agreement now and protect yourself from unexpected hassle and expense. Once you purchase the Agreement, a simple phone call is all that it takes for you to schedule service. You can call anytime day or night, or schedule a service appointment online. Sears has over 12,000 professional repair specialists, who have access to over 4.5 million quality parts and accessories. That’s the kind of professionalism you can count on to help prolong the life of your new purchase for years to come. Purchase your Repair Protection Agreement today! Some limitations and exclusions apply. For prices and additional information call 1-800-827-6655. Sears Installation Service For Sears professional installation of home appliances, garage door openers, water heaters, and other major home items, in the U.S.A. call 1-800-4-MY-HOME® Sears Brands, LLC ASSEMBLY AND OPERATION WarnInG Before installing this accessory, shut the engine off and allow it to cool. Disconnect the spark plug wire from the spark plug. Refer to the mower’s Operator’s Manual for complete safety instructions. Do not operate the mower without the entire grass bag in place. Turn the mower off and disconnect the spark plug before emptying the grass bag. Carton ContEntS Before installing this accessory, remove all parts from the carton. Carton contents, including items included within the hardware pack, are shown in Figures 1 and 2. Part numbers are shown in parentheses and each item has been identified with a letter code, [X], for use when following the assembly instructions. Reference to right or left side of the mower is observed from the operating position. InStall thE rIGht SIdE BraCkEt 1. 2. Shut off engine and disconnect the spark plug wire. Remove the following from the right side of the upper handle, Figure 3. The hardware removed can be discarded. · Two 1/4-20 screws · Two flat washers · Two 1/4-20 cap lock nuts remove the right Side hardware toolS rEquIrEd Two 7/16 ” wrenches or two adjustable wrenches, and one set of pliers. [A] – Grass bag (764-04052) [B] – Chute Assembly (931-04239) [D] – Rod Hanger (747-04671) Figure 3 Install the right Bracket 3. [E] – Rod Bracket (787-01569-0637) [C] – Rod Assembly (647-04110-0637) Align holes in rod assembly [C] with holes in panel and secure with the following items from the hardware pack, Figure 4: · Two 1/4-20 x 1.75 ” screws [F] · Four flat washers [H] · Two 1/4-20 cap lock nuts [G] Figure 1 [G] – Lock Cap Nut, 1/4-20 (Qty. 4) (712-0442) [F] – HH Cap Screw, 1/4-20 x 1.75 ” (Qty. 4) (710-0136) [H] – Washer (Qty. 8) (736-0463) C F H [I] – Cable Tie (Qty. 1) (726-0209) G H Figure 2 – Contents of the hardware pack. Figure 4 ASSEMBLY AND OPERATION InStAll thE lEFt SIdE BRACkEt Remove the left Side hardware 1. Remove the following from the left side of the upper handle, Figure 5. The hardware removed can be discarded. · Two 1/4-20 screws · Two flat washers · Two 1/4-20 cap lock nuts ASSEMBlE thE GRASS BAG 1. 2. Place grass bag [A] over chute assembly [B], Figure 7. Use the cable tie [I] to secure bag to chute assembly by inserting the cable tie into hole in bag and pulling through. Make sure cable is positioned so it ties bag around indented groove (over flange) of chute, Figure 7. Pull cable tight with pliers. I A B Figure 7 Figure 5 AttACh thE Rod hAnGER 1. 2. Insert rod hanger [D] into the opening in the rod assembly [C]
Wikipedia’s page for Craftsman
Company Web Site: www.craftsman.com


 Craftsman Owners Manual - 1 of 12
 Craftsman Owners Manual - 2 of 12
 Craftsman Owners Manual - 3 of 12
 Craftsman Owners Manual - 4 of 12
 Craftsman Owners Manual - 5 of 12
 Craftsman Owners Manual - 6 of 12
 Craftsman Owners Manual - 7 of 12
 Craftsman Owners Manual - 8 of 12
 Craftsman Owners Manual - 9 of 12
 Craftsman Owners Manual - 10 of 12